Image Flashing Guide
- Milk-V Megrez
- SiFive HiFive Premier P550
- PINE64 StarPro64
Preparation
Hardware Requirements
- Milk-V Megrez
- USB A to C / USB C to C Cable
- DC 12V / ATX PSU
- eMMC module / M.2 SATA SSD / PCI-E SSD (adapter card required for M.2 NVMe SSD) / microSD card
- You can choose any of the storage devices as boot media, but you can only use one at a time.
- (Optional) Keyboard, mouse, monitor, ethernet cable
- (Optional) M.2 SDIO Wi-Fi Module
- (Optional) A USB drive formatted in FAT32 or EXT4 to upgrade firmware
- Or you may use
dhcportftpbootinstead, which requires ethernet connection and a TFTP server setup on your computer
- Or you may use
- (Optional) A M.2 SATA or M.2 NVMe / PCI-E SSD to USB enclosure
- For flashing the image to SSD
- (Optional) microSD card reader
- For flashing the image to microSD card
Image Downloads
For bootloader, boot and root images, download from here.
- BootFS:
boot-rockos-*.ext4.zst - RootFS:
root-rockos-*.ext4.zst - For SD Card and SSD:
sdcard-rockos-*.img.zst - Bootloader:
bootloader_secboot_ddr5_milkv-megrez.bin
After downloading, please extract the boot and rootfs files.
If you want to upgrade bootloader via a USB drive, copy the bootloader_secboot_ddr5_milkv-megrez.bin file into the drive's first FAT32/EXT4 partition.
On Linux, install zstd and decompress the iamge.
On Windows, you can use tools like 7-zip or Nanazip.
Flashing Image
Upgrading bootloader firmware (recommended)
First of all we should upgrade the firmware, a.k.a. bootchain for EIC7700X boards.
In short, you need to load the firmware into RAM, then run es_burn to write the firmware to onboard SPI Flash.
To load the bootloader file, you have a few options:
- From an internal or external storage device
ext4loadfatload
- From network / LAN
tftpbootdhcp
- Connect the onboard USB Type-C "Debug" port to your computer.
You will see a CH340 USB to UART serial device showing up.
- Open the UART serial terminal.
On Linux you can use tools like tio, minicom and more.
On Windows there are PuTTY, SimplySerial and more.
The default baud rate is 115200.
- Now plug in the power. Megrez should automatically power on.
Make sure your boot device is properly installed before powering on.
If you want to upgrade via a USB drive, plug it in before powering on. Make sure you plugged into the two ports near the 3.5mm ports, otherwise it might not be picked up in U-Boot.
- While the console prompts
Autoboot in 5 seconds, presssto stop the autoboot.
Upgrade via USB drive
- Check if the USB Drive is detected:
usb info
If you plugged the USB drive after boot, you need usb reset to rescan USB devices.
2.1. If your drive is FAT32: fatload usb 0 0x90000000 bootloader_secboot_ddr5_milkv-megrez.bin
2.2. If your drive is EXT4: ext4load usb 0 0x9000000 0bootloader_secboot_ddr5_milkv-megrez.bin
-
Flash the firmware and reboot:
es_burn write 0x90000000 flash; reset -
After rebooting, it is recommended to reset U-Boot env vars to default and save:
env default -a -f; env save; reset
Other wise you might see your MAC address is regenerated on every boot.
Upgrade via TFTP
Set up a TFTP Server.
For Windows you may use TFTPd64, for Linux you may use tftp-hpa, atftp, or even dnsmasq has a TFTP server built in.
Please check your distros' documations for usage.
Or you may want to check out Arch Wiki here.
Make sure the TFTP server is serving the bootloader_secboot_ddr5_milkv-megrez.bin file at the root directory.
Then check your computer's LAN IP.
Make sure the board is plugged in to ethernet.
After interrupting the autoboot, type:
dhcp 0x90000000 $hostIPaddr:bootloader_secboot_ddr5_milkv-megrez.bin
es_burn write 0x90000000 flash; reset
As said above, it is recommended to reset U-Boot env vars to default and save after upgrading:
env default -a -f; env save; reset
Other wise you might see your MAC address is regenerated on every boot.
Flash to eMMC via fastboot
After upgrading the bootloader, power on the board, type s to interrupt autoboot, then following these steps:
-
In U-Boot console:
fastboot usb 0 -
Find the
RECOVERYswitch beside the DC barrel jack. Flip it toRECOVERYmode. Your computer should pick up aUSB download gadget/Android Bootloader Interface. -
Use
fastbootto flash the firmware.
(On Linux, you'll need sudo, or add VID:PID 3452:7700 to your udev rules.)
fastboot flash boot boot-rockos-20250818-234921.ext4
fastboot flash root root-rockos-20250818-234921.ext4
-
Wait for the flashing process to complete. After that, press Ctrl+C in U-Boot console, then type
resetto reboot. -
You're good to go.
Although U-Boot also supports fastboot udp to flash via network, but this would be much slower.
Flashing via network is generally not recommended, unless you're doing it remotely and cannot flip the switch.
Flash to SSD or microSD
Just use etcher or dd to write the sdcard image into SSD or microSD.
For Windows users, Rufus is also okay.
sudo dd if=sdcard-rockos-20250818-234921.img of=/dev/sdX bs=1M status=progress; sync
Since the bootloader is inside the onboard SPI Flash, if you have any troubles booting from microSD or SSD, update the bootloader first and then retry.
Hardware requirements
- HiFive Premier P550
- DC 12V / ATX PSU
- SATA SSD / PCI-E SSD (adapter card required for M.2 NVMe SSD) / microSD card
- You can choose any of the storage devices as boot media, but you can only use one at a time.
- (Optional) Keyboard, mouse, monitor, ethernet cable
- (Optional) M.2 SDIO Wi-Fi Module
- (Optional) A USB drive formatted in FAT32 or EXT4 to upgrade firmware
- Or you may use
dhcportftpbootinstead, which requires ethernet connection and a TFTP server setup on your computer
- Or you may use
- (Optional) A M.2 SATA or M.2 NVMe / PCI-E SSD to USB enclosure
- For flashing the image to SSD
- (Optional) microSD card reader
- For flashing the image to microSD card
Bootloader
First, establish a serial connection to the board. Once the cables are correctly connected, the board will be listed as four UARTs.
This chart below is for SiFive HiFive Premier P550 only, while other boards might have different.
Following Section 2.1.1.1 of the MCU User Manual, set the ttyUSB2 as the connection path in minicom, and set the baud rate to 115200.
| No. | Device |
|---|---|
| 00 | SOC JTAG (eic7700x mcpu) |
| 01 | MCU JTAG (stm32) |
| 02 | SOC UART (eic7700x uart0) |
| 03 | MCU UART (stm32 uart3) |
sudo minicom -D /dev/ttyUSB2 -b 115200
Insert the prepared USB drive containing the bootloader file.
After pressing the power button to boot, observe the minicom window and interrupt the U-Boot booting by pressing Ctrl+C or enter.
Execute the following commands to check the files on the USB drive:
usb start

fatls usb 0 / # If multiple files are present on the USB drive, please confirm the storage path of the bootloader file.
After verifying the correct files on the USB drive, execute the following commands:
fatload usb 0 0x90000000 bootloader_secboot_ddr5_hifive-p550.bin

es_burn write 0x90000000 flash
After rebooting, interrupt the U-Boot booting again and execute the partitioning command (required for the first flash to allocate sufficient space for the boot/root images).
reset
# Interrupt U-Boot startup
run gpt_partition
Flashing the Image to eMMC
Connect the board to the host system using both the USB Type A to USB Type C and USB Type A to USB Type A cables.
According to Section 3.1.6 of the official user manual:
- Insert the USB Type A to USB Type A cable into the upper port of the dual USB Type-A connector labeled as #10.
- Insert the USB Type A to USB Type C cable into the Type-C USB connector labeled as #15.
Boot & Rootfs
After starting and interrupting the machine, enter the following command to enter fastboot mode. (Make sure to disconnect the USB Type A to USB Type A cable beforehand to avoid circuit or communication conflicts.)
fastboot usb 0
Open another terminal on the host and execute the following flashing commands:
sudo fastboot flash boot boot-eswin_evb-20241024-145708.ext4   # Flash boot
sudo fastboot flash root root-eswin_evb-20241024-145708.ext4   # Flash rootfs
# Ensure the file paths are correct; flashing time may take 10 minutes
Return to the minicom terminal, press Ctrl+C or enter to exit fastboot mode, and execute reset to reboot the machine.
At this point, the RockOS image flashing is complete.
Hardware requirements
- PINE64 StarPro64 board
- USB A to A cable (or USB A to C cable)
- DC 12V power supply
- eMMC module / PCI-E SSD (M.2 NVMe SSD adapter card needed) / microSD card
- You can choose any of the storage devices as boot media, but you can only use one at a time.
- USB-UART serial debugger
- Ethernet cable
- Use
dhcportftpbootto load bootloader from the network
- Use
- (Optional) Keyboard, mouse, monitor
- (Optional) M.2 SSD to USB enclosure
- For flashing the system image to SSD
- (Optional) microSD card reader
- For flashing the system image to microSD card
Image download
Please download bootloader, boot and root image from here.
- BootFS:
boot-rockos-*.ext4.zst - RootFS:
root-rockos-*.ext4.zst - microSD and SSD:
sdcard-rockos-*.img.zst - Bootloader:
bootloader_secboot_ddr5_pine64-starpro64.bin
Please decompress bootfs and rootfs images after downloading.
If you want to upgrade bootloader firmware via a USB drive, please copy bootloader_secboot_ddr5_pine64-starpro64.bin to the drive's first FAT32 or EXT4 partition.
(The stock bootloader may not recognize USB devices, in this case, use network loading instead.)
You may rename it to a shorter file name for convenience.
On Linux, install zstd to decompress.
On Windows, use software like 7-zip or Nanazip to decompress.
Flashing the image
Update bootloader firmware (recommended)
In short, you need to load the firmware into RAM, then run es_burn to write the firmware to onboard SPI Flash.
If your board is the stock bootloader (shipped with the board, never upgraded), your bootloader may not pick up USB devices.
In this case, use either tftpboot or dhcp.
- Connect USB-Uart to the board.
See below for UART GND/TX/RX connections.
| Debugger | Board |
|---|---|
| GND | GND |
| TX | RX |
| RX | TX |
| 3V3 | NC/DO NOT CONNECT |
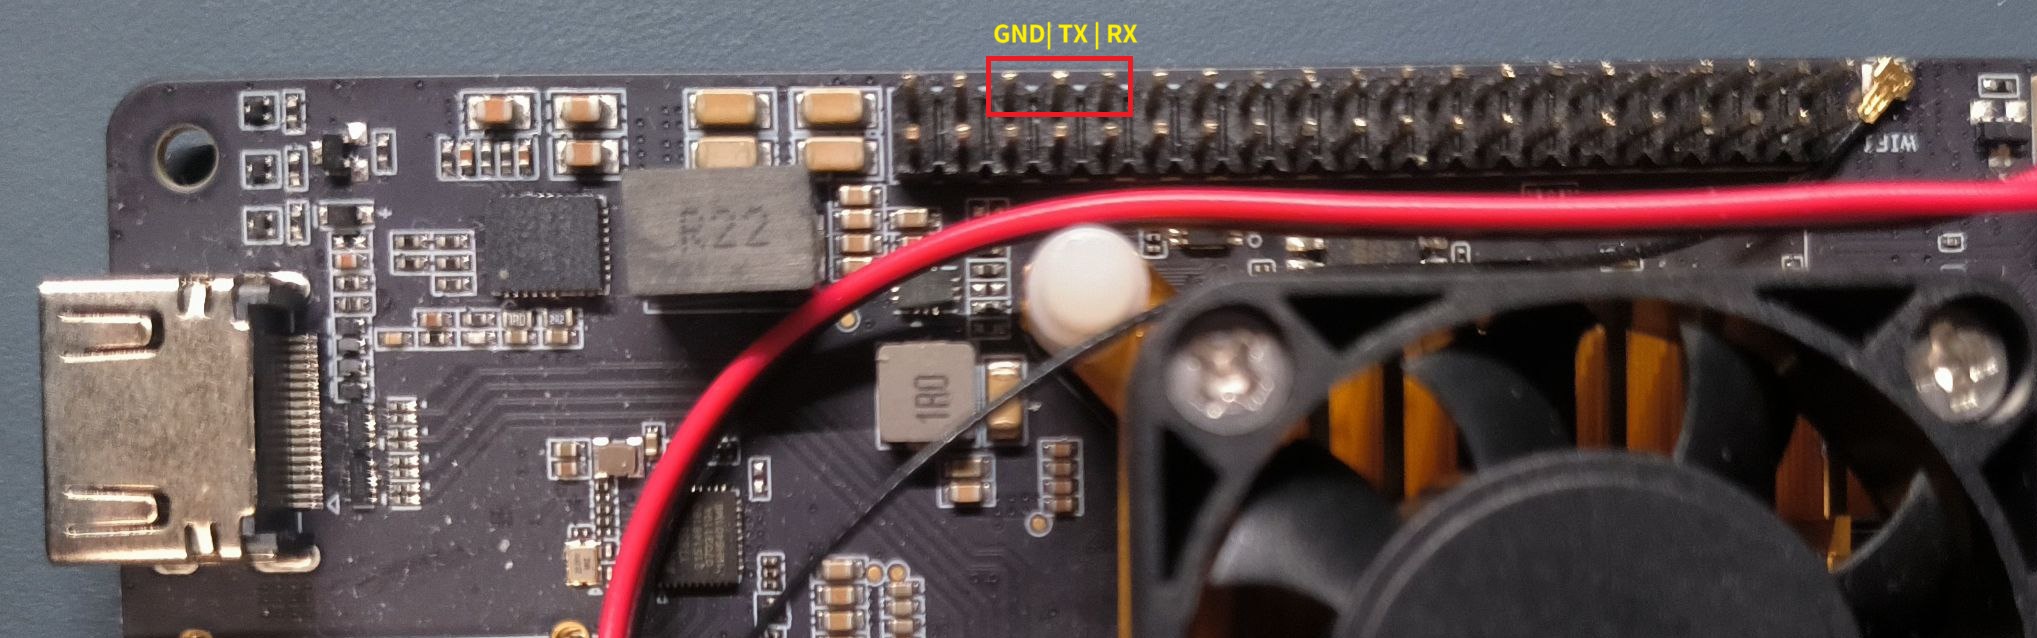
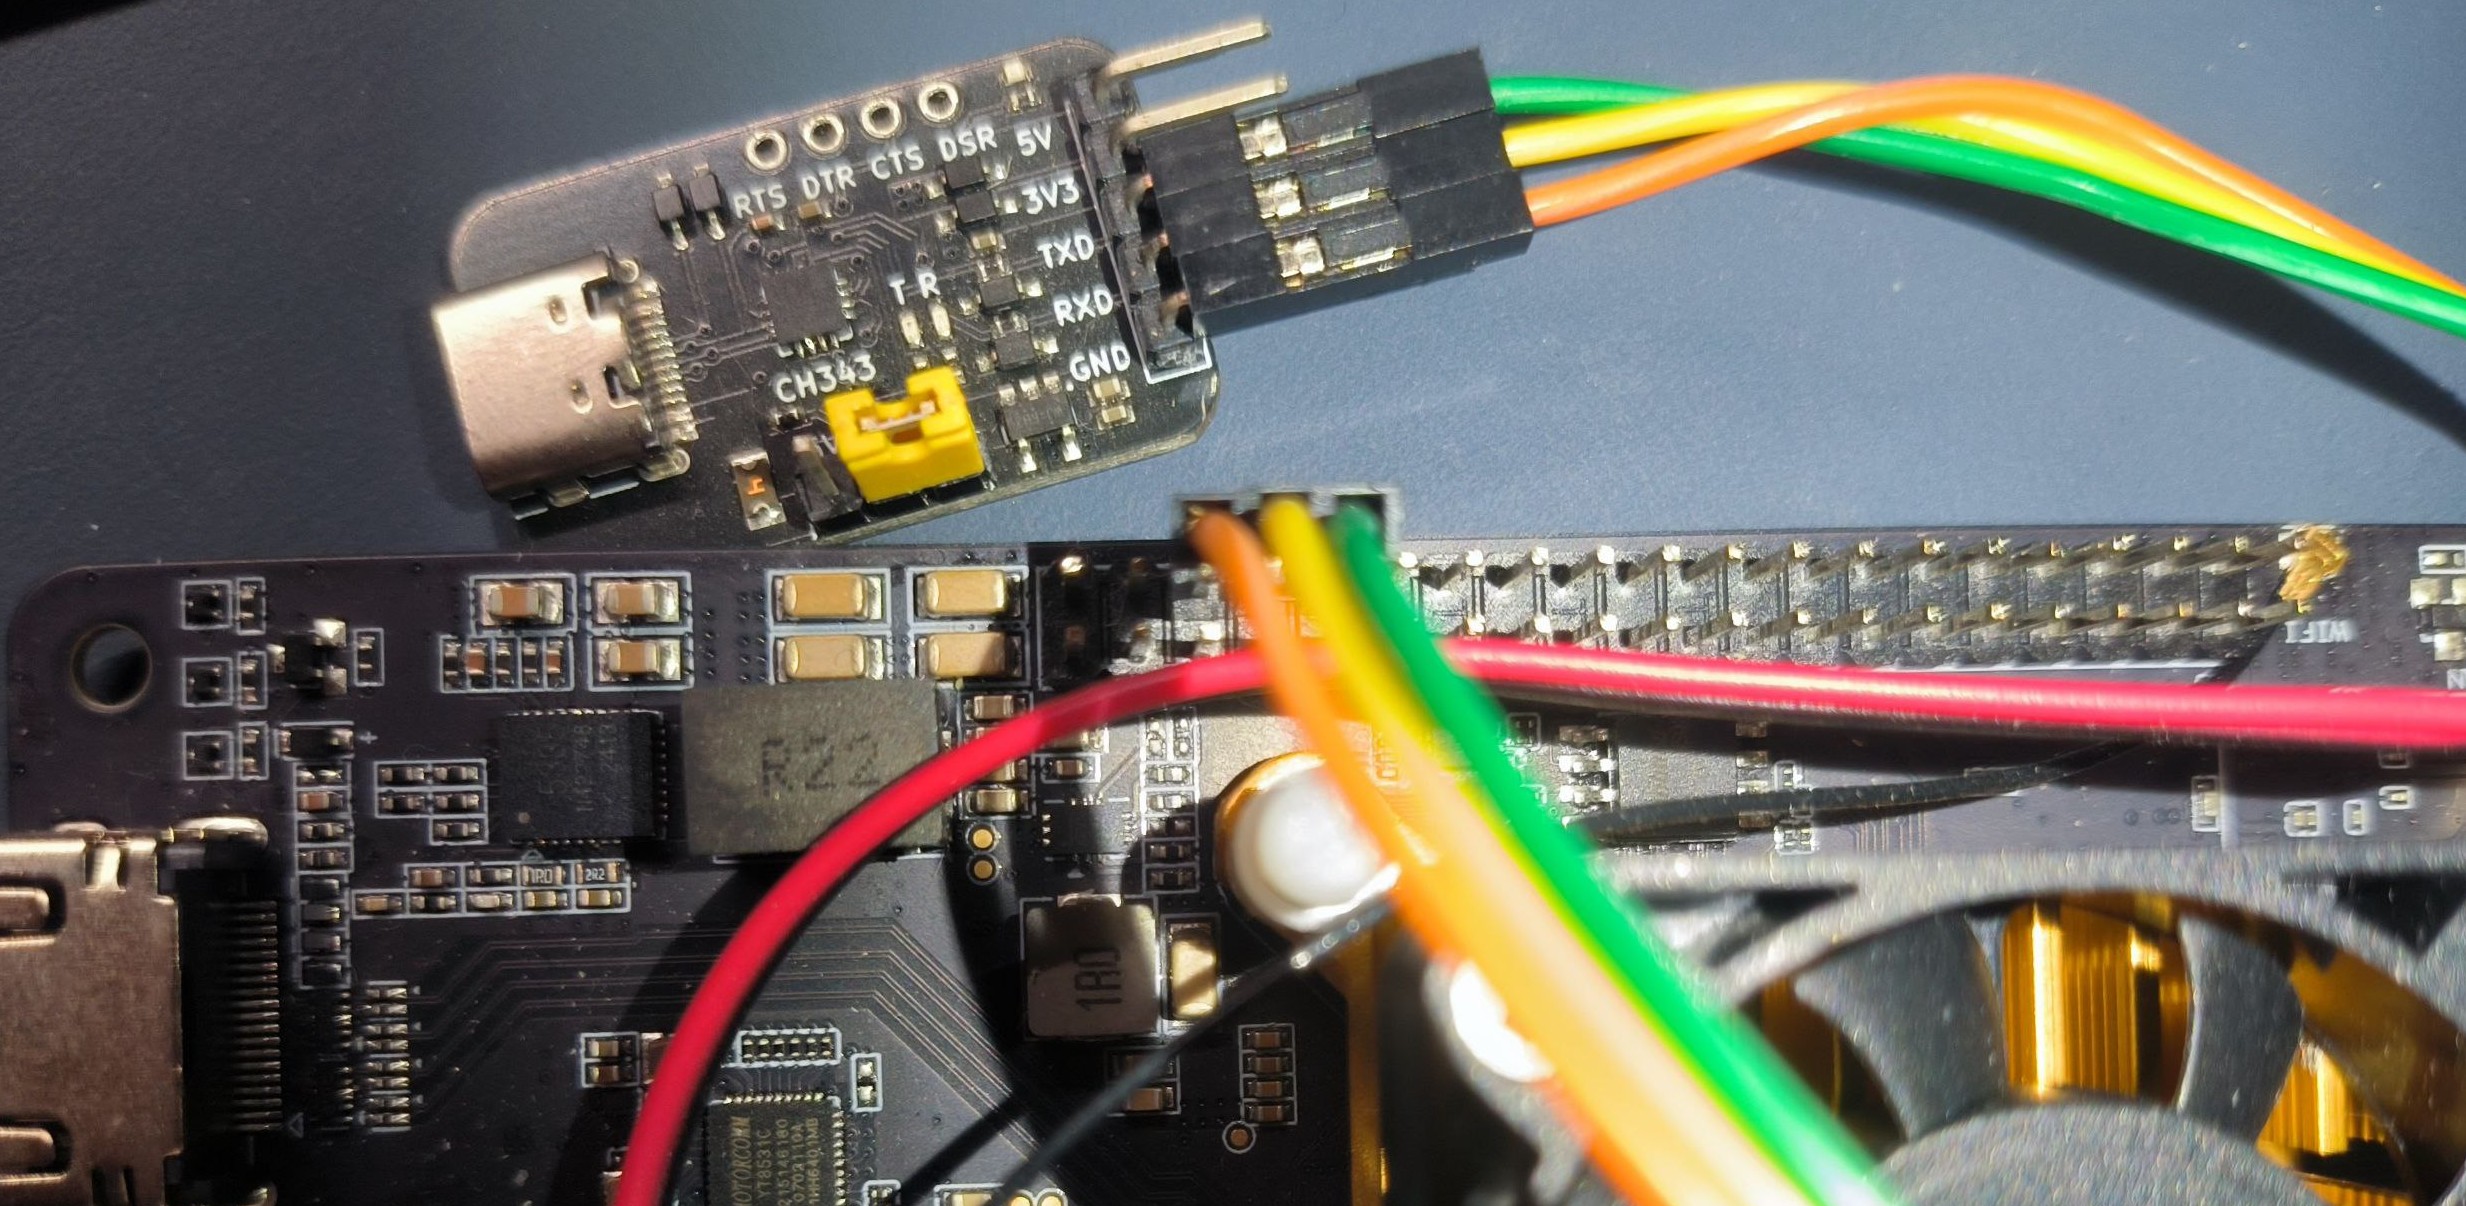
- Open serial console.
On Linux, use tio or minicom.
On Windows, usePuTTY or SimplySerial.
The default baud rate is: 115200.
- Plug in the power, the board will power on automatically.
Make sure the boot device is installed before powering on.
- When prompting
Autoboot in 5 seconds, presssto interrupt autoboot.
Update via TFTP
Set up a TFTP Server.
For Windows you may use TFTPd64, for Linux you may use tftp-hpa, atftp, or even dnsmasq has a TFTP server built in.
Please check your distros' documations for usage.
Or you may want to check out Arch Wiki here.
Make sure the TFTP server is serving the bootloader_secboot_ddr5_pine64-starpro64.bin file at the root directory.
Then check your computer's LAN IP.
Make sure the board is plugged in to ethernet.
After interrupting the autoboot, type:
dhcp 0x90000000 $hostIPaddr:bootloader_secboot_ddr5_pine64-starpro64.bin
es_burn write 0x90000000 flash; reset
As said above, it is recommended to reset U-Boot env vars to default and save after upgrading:
env default -a -f; env save; reset
Other wise you might see your MAC address is regenerated on every boot.
Flash to eMMC via fastboot
After upgrading the bootloader, power on the board, type s to interrupt autoboot, then following these steps:
-
If this is the first time flashing the image, please run
run gpt_partitionin U-Boot console to repartition the eMMC. -
Enter fastboot mode:
fastboot usb 0 -
Connect your board with your PC with USB A to A cable.
(If your PC only have USB Type-C, USB C to A cable can also work, with Type-C side to the PC, and Type-A side to the board)
There are 2 blue USB 3.0 ports on StarPro64. When specifying usb 0, use the port below.
Your computer should pick up a USB download gadget / Android Bootloader Interface.
- Use
fastbootto flash the firmware.
(On Linux, you'll need sudo, or add VID:PID 3452:7700 to your udev rules.)
fastboot flash boot boot-rockos-20250818-234921.ext4
fastboot flash root root-rockos-20250818-234921.ext4
-
Wait for the flashing process to complete. After that, press Ctrl+C in U-Boot console, then type
resetto reboot. -
You're good to go.
Though U-Boot supports fastboot udp over network, it is way much slower.
This is usually not recommended unless you're doing it complete remotely, without physical access to the board.
Flash to SSD, microSD or eMMC via the adapter
Just use etcher or dd to write the sdcard image into SSD or microSD.
If your board comes with eMMC and its adapter, you can dd the image into eMMC as well.
For Windows users, Rufus is also okay.
sudo dd if=sdcard-rockos-20250818-234921.img of=/dev/sdX bs=1M status=progress; sync
Since the bootloader is inside the onboard SPI Flash, if you have any troubles booting from microSD or SSD, update the bootloader first and then retry.
Other Notes
It is recommended to do a system upgrade after booting into the system.
sudo apt update; sudo apt upgrade -y; sudo reboot
Default username and password are both: debian